BORAT: Bathroom Occupancy Remote Awareness Technology with Arduino
The Occupancy Unawareness Problem
A great company where I used lead Engineering Team, Wanelo, with all of it’s 50 or people, moved to a new office on 5th street which has only two single-occupancy bathrooms, each on a separate floor.
A few times a day, when the need was strong, I’d go to the downstairs bathroom only to find its door locked. I’d then run upstairs and find the other one locked too… Damn! I’d come back down only find out that someone else grabbed the first bathroom while I was upstairs. Argh!
You can likely see how this could be a frustrating and disruptive experience even just once or twice. Now multiply that by 35 employees and every work day of the year, and you end up with an actual productivity problem.
Given my foray into Arduino over the last few months, I knew I could come up with a solution. I got approved for a small budget of about $200, and started looking around.
NOTE
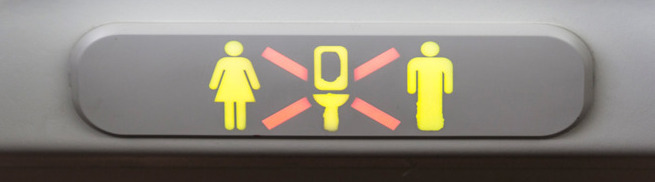
The problem was very simple: people needed to know when each bathroom was occupied, or not. Just like on an airplane you can see bathroom light on/off, I wanted something similar for our two bathrooms. Something everyone could see.
Solution: Broadcasting Occupancy Status
The first question on my mind was: “How would I let everyone know, if one or both bathrooms are occupied?”. I decided to follow a familiar airplane concept, and introduce a display unit, which would be large enough, and bright enough, to be visible from most parts of our office. Luckily we have an open plan, so placement was not an issue.
By that time I was playing with a couple of Rainbowduinos which were driving 8x8 LED Matrix displays, and I was pretty impressed with the results. I immediately knew I wanted to use these to indicate the status of occupancy. Initially I thought the green matrix should indicate that a bathroom is available, while red would mean occupied. I basically went with this for the final version, although I added some lava-lamp like animations to make things more interesting.
How can I KNOW for certain that the bathroom is free?
 The next question was — how would the display unit receive information about each bathroom status? This part was easy — I picked up a few nRF24L01+ radios for very cheap. Most excellent RF24 communications library has some of the best Arduino C++ code I’ve seen, and so it instilled confidence in this approach. Quick test of the radios at work showed that they are more than capable of reaching through the walls.
Detecting Occupancy Status: Brainstorming Ideas…
The last problem was about actual occupancy detection.
And this is where things got quite a bit more tricky.
I brainstormed with a few folks on many an option. We discussed:
- Detecting the status of the door’s lock. This would have been great, but required changing the locks in a rented building, which was not allowed. There are additional issues with this solution, but I won’t go into that here.
- I saw some projects online where people used magnetic strips to detect if the door is simply closed or open. However, this requires everyone to leave the door open when they leave — not realistic!
- Some suggested relying on light detection alone. Easy and cheap? Yes. Reliable? No. Not only that, but the bathroom fan is connected to the light switch, so people often leave the light on deliberately to keep the fan going.
- Another simple option would be to use a motion sensor. However this alone is simply not sufficient, as we’ll see in a moment.
It was clear to me that a combination system was needed. Something that not only relies on light or motion detection alone, but uses a combination of multiple sensors. Pretty soon, I settled on using just these three:
- Light sensor
- Motion sensor
- Sonar distance sensor
Shortly after, I received all the pieces in the mail, had a plan in my head, and was ready to proceed with the implementation.
The Grand Solution, as Borat would say “Very Nice!”
 Enter the project (all of which is open sourced under an MIT License), which took good month working some nights and weekends this summer to complete:
Project — BORAT: + AKA the Bathroom Occupancy Remote Awareness Technology.
BORAT© is an Arduino-based toilet occupancy notification system. It uses inexpensive wireless radios nRF24L0z+ to communicate occupancy status of one or more bathrooms to the main display unit located in a highly visible area. You may be asking — why in the hell does the observer unit (which determines occupancy) need sonar? Well, if you’re like me, you like to take your time when you are … you know. Perhaps I don’t move very much during this time. Maybe I’m reading my phone. This would cause the motion sensor to eventually give up and show a green light. This is where sonar comes in. Aimed directly at someone sitting on the toilet, sonar will read a different distance with a person there versus without. You can configure the threshold after installing Observer, and — voila! Near 100% accuracy! Is it creepy to have a 2-eyed robot staring at you in the bathroom? I’ll leave that question to the reader.
My company can’t live without this technology now. I took a unit home one night to fix it, and forgot to bring it back. The next day everyone I’d bump into was asking “Where is BORAT? What happened?” It’s amazing how quickly humans get used to things that are actually useful.
Building Blocks
BORAT consists of two logical units:
Observer Units (Up to 8 theoretically, 2 in practice)
Multiple Observer Units, installed in each bathroom. They’re based on the set of three sensors, a knob, an LCD serial port for on-premises configuration of the unit, and a wireless nRF24L01+ radio card. Up to 5 observer units are supported (this is a limitation of the radio).
A single Display Unit
The Dilay Unit, which uses LED Matrices to display the status of each bathroom occupancy. This unit can be additionally (and optionally) equipped with an Ethernet shield, in which case a small HTTP web server is started. This reports occupancy status over a simple JSON API.
Here is a diagram that explains various placement options and the overall concept.
 Remember, communication is wireless. These little cards are pretty damn impressive. They get through walls and significant distances (50-100 feet) when used across line of sight. I did have to move the display unit once from a place that had three walls separating it from the Observers, which made for spotty connection. Its new location has only two walls of separation, and it works flawlessly.
Gory Details
Observer Unit Logic
Observers are responsible for communicating a binary statu s to the display unit: either occupied or available. The display unit also has third status: disconnected, for each observer unit. But Observers don’t have that.
How do Observers determine if the bathroom is occupied? They do so based on the following logic:
. If the light is off, the bathroom is available . If the light is on, we look at the motion sensor - if it detects movement within the last 15 seconds, the bathroom is considered occupied . If the motion sensor did not pick up any activity, we then look at the sonar reading. ** If the sonar (which is meant to be pointed at the toilet) is reading a distance below a given threshold, it means someone is sitting there, and so the bathroom is occupied. ** Otherwise, it’s available.
 That’s it! All settings and thresholds, including timeouts, are meant to be tweaked individually for each bathroom. This is why Observer units contain a rotary encoder knob and a connector for external serial port. This is meant to be a Serial LCD Display used only to configure the device.
The diagram below shows the components used in each Observer unit. They are, for reference:
Observer Unit (quantities per unit):
- 1 x Arduino Nano (I chose an older Nano because of the Nano IO Shield. This saved me from having to wire up the RF24 radio. It also has breakouts for sensors, which is very convenient.)
- 1 x Arduino Nano IO Shield
- 1 x nRF24L01+ radio
- 1 x Sonar HC-SR04 Distance Sensor
- 1 x Photo Resistor
- 1 x Infrared PIR Motion Sensors
- 1 x Rotary Encoder Knob
- 1 x RGB LEDs for status communication
- 1 x Microtivity Prototyping Board, 5x7cm
- 1 x Female port for JST 3-wire cable
- Many spacers, # 4-40 nut and #4-40 screws, also M2 sizes
Configuration using LCD and Rotary Encoder Knob

To make changes visible to the user of the Observer module, one must have a Serial LCD display to show the feedback and new values. I found Sparkfun Serial 16x2 LCDs to be reliable and easy to use, and I have been converting most of my Arduino projects to report status data on that serial port.
Here is a picture of one of the observer units attached to the debugging LCD, which is communicates via a serial cable. The LCD is optional and can be plugged in or out at any time.
Configuring Observer. Legend:
NOTE
D => Sonar + M => Motion + L => Light. + The “Plus/Minus” next to each letter indicates it’s been triggered, or that the above threshold (sonar and light). First numeric value in brackets is the sensor reading, second is the threshold:

The settings that can be changed are (and are cycled through by pressing the button):
. Light sensitivity (between 0 and 1023): A light reading below the threshold will be considered “dark” and will render the overall status as “unoccupied”.
. IR Sensor Delay: This is a delay in milliseconds that “blocks” any reading of the motion sensor after any change was detected (this is so that it does not flicker). Typically set to 5000ms, it means that once motion is detected, the motion sensor reading is considered positive regardless of what the sensor actually reports.
. Sonar Distance (in cm): A distance threshold is used to decide if sonar is detecting someone or not. Values less than the threshold are positive (occupied), while larger values than the threshold are negative (unoccupied).
. Exit Timout (in seconds): If the light was left on, and we detected occupancy, but no longer do — how long should we consider the room still occupied? If you make this number too small, the overall status will flicker as various sensors are triggered, but are then released. Setting this to 10-30 seconds is reasonable. Remember, if the person using the bathroom turns off the light, the timeout is not used.
. Save Settings?: Defaults to NO, but if YES is chosen, parameters are saved to EEPROM, so even if the unit reboots they persist and are used moving forward by that unit. . Disable Radio?: Sometimes it’s convenient to configure the sensors alone, without the unit attempting to connect to the dmothership (the display unit). Set that to YES and radio will temporarily deactivate. This is not saved to EEPROM.
Observer Module Designs and Enclosures
Over the last few months, I built three separate Observer modules. The first two had sonar built into the laser-cut enclosure, so to aim it properly, you’d have to move the entire enclosure.
By the way, need to make some laser-cut boxes? Check out MakeABox.io. It’s a tool I built after getting frustrated with the crowd favorite — BoxMaker. But that’s another blog post.
Since it is not practical to be tilting or leaning the enclosure itself to aim at the toilet, I updated the design, moving the Sonar sensor to the top of the box, using an arm I designed. It’s incredible what can be created in 2D and then turned into a 3D object!
The new arm allows movement using three degrees of freedom. This design is clearly more flexible and can adapt to various locations much better then the previous ones.
The template files inside the enclosure folder of the project contain designs for the boxes, as well as the arm. Feel free to use them. By laser-cutting these parts, you too can assemble BORAT boxes and the sonar arm.
'''
Early Boxes with Fixed Sonar


'''
Flexible Arm Designs


'''
On the Inside
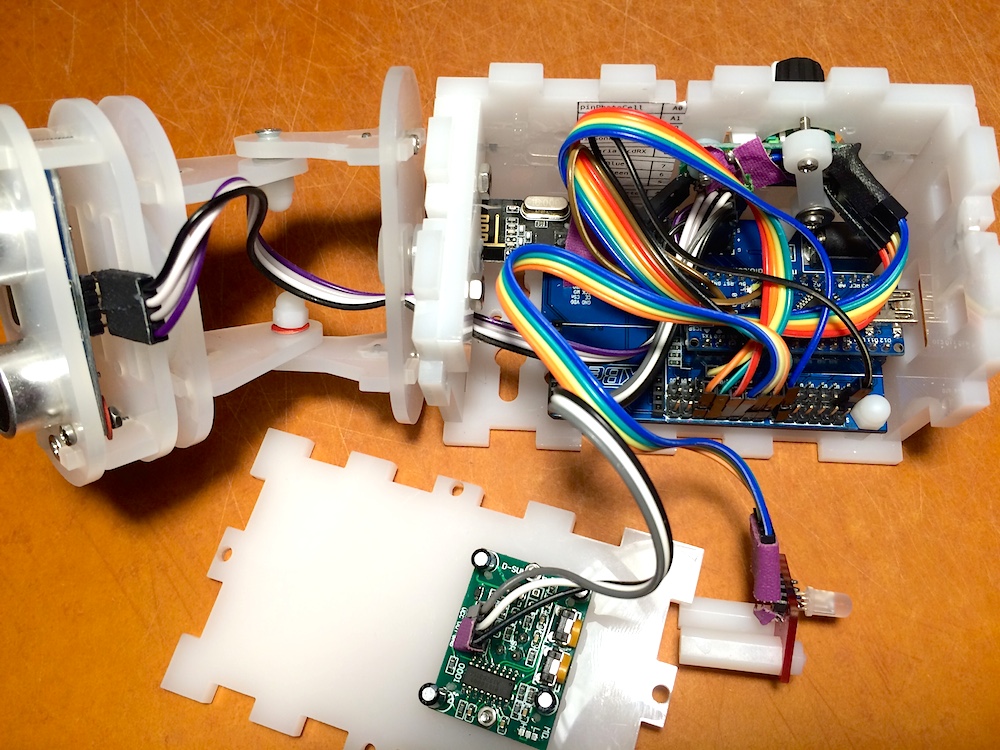 Finally, here is the unit opened up so you can see how it’s put together. I am a big fan of spacers, and mounting items to the enclosure, so I use a lot of cables to connect things up. Plus, this way you could always replace faulty components over time.
Display Module
The Display unit can be implemented in a variety of ways. I chose to use:
- 2 x 8x8 LED Matrices
- 2 x Rainbowduinos, programmed with the DisplayLED sketch
- 1 x Primary Arduino Uno which acts as the master for the Rainbowduinos. It listens to the wireless network notifications, and based on this data, it sends one of three possible states to the Rainbowduino units, each of which are assigned to rooms
- 1 x Arduino Prototyping Shield
- 1 x Ethernet Shield for JSON server
- 2 x RGB LED for status
- 1 x Female port for JST 3-wire serial cable
- Several patch cables
- Custom made laser-cut enclosure
- Spacers, #4-40 nuts and bolts
I then glued 4 plastic spacers to the back of the two Rainbowduinos (2 per each), so that I could screw the Uno on top. The spacers were aligned to Uno’s mounting holes (in fact I had them screwed when I glued them to ensure they were perfect). This created a system where Uno was also acting as a brace, and enforcing the connection between two Rainbowduinos, making the entire structure rigid.
Tall spacers filled the box all the way to the top, pushed LED matrices flush with the front side of the enclosure. This approach allowed me to avoid screwing or glueing things inside of the box altogether: everything was held up by the pressure of the box. I did put a couple of foamy pieces in a few places to ensure the internals do not bounce in any dimension.


'''
Conclusion
What’s the moral of the story? Who am I kidding.

It sure is nice to know if you can or can’t use the restroom, without having to get up from your desk.
Could have this been done cheaper? Absolutely! Smaller? Definitely! Neater, prettier, faster, etc? You bet.
But I had a lot of fun along the way, and it’s been such a pleasure to work with “atoms”, not “bits” for a change (although you could say this project required a good deal of bits too :-)
Do you want to help me design a PCB board to make the next Observer Unit? Please get in touch! Create an issue on GitHub, and describe your idea, and I’ll make sure to respond asap.
Also — please leave comments, feedback, and suggestions. All of those nice things.
Thanks for reading,
---- Konstantin.
Comments