How to Write Awesome CLI tools in Ruby and test them with RSpec and Aruba
You may or may not know that I love writing CLI utilities in Ruby and open-sourcing them as ruby gems. You can install a ruby gem with gem install name on nearly any UNIX system, including a Mac.
The Gem githuh
One out of a few dozen ruby gems I authored is a neat utility called githuh — a play on GitHub™, of course.
TIP
Once you install the gem, the command githuh will be in your path, offering a CLI interface to Github’s API v3 and is an extensible utility that supports any number of commands and sub-commands with optional arguments and options.
I hoped to create an easy-to-extend ruby library that would let others add useful Github-related functionality and share it with others by means of this gem, by submitting a pull-request.
So What Is This Post About?
This post is about writing CLI tools in Ruby. It’s about:
- How using dry-cli gem makes it easy to write extensible CLI tools that accept commands, sub-commands, command-specific arguments and options.
- How to test CLI tools using RSpec and Aruba.
- How to use Aruba’s in-process mode to speed up your test suite.
- How to use the
dry-cligem to create multi-command and sub-command CLI tools. - And least importantly — what the gem ‘githuh’ does, perhaps you might need it once day.
Why dry-cli?
When you write CLI tools, you generally want to use a library that performs argument parsing and the “help message” generation automatically. Ruby has plenty of those, from the standard library’s optparse, to Chef’s Slop, Thor, and a more recent newcomer — Dry::CLI.
I am a big fan of the Dry-Rb collection of gems, target=“_blank”, and so I have been trying to use Dry-CLI gem for some time and across several projects. Despite a few small hiccups, this is perhaps the best and most versatile CLI framework I found. Should you be starting a new CLI tool today — it’s the one I would recommend.
Using Commands and Sub-Commands
Githuh uses commands and sub-commands, which have arguments and options.
- Argument — is typically required and is often passed as a command line argument, while
- Options — can be optional, and are expressed as command line flags.
For instance — in the below help message, REPO is an argument, while --api-token is an option.
Usage:
  githuh issue export REPO

Description:
  Export Repo issues into a CSV or JSON format
  Default output file is <username>.<repo>.issues.<format>

Arguments:
  REPO                 # REQUIRED Name of the repo, eg "rails/rails"

Options:
  --api-token=VALUE    # Github API token; if not given, user.token is read from ~/.gitconfig
Developing and Testing CLI scripts in Ruby using RSpec and Aruba
One of the challenges of writing CLI tools is automated testing.
On one hand, we want to be rigorous with our tests, and executed our CLI command with various arguments. On the other hand, we typically want to stub and mock things, and prevent the CLI tool from actually hitting remote sites in tests. Right?
So how do you accomplish this?
The answer is in the ingenous gem called Aruba. It integrates nicely with RSpec, and offers several important matchers for verifying the result of an external command execution.
The only caveat of this integration — is that it can be rather slow.
If Aruba testing is slow for you, don’t worry — there is a trick to it. This is what I want to showcase in this post.
Combining RSpec and Aruba
Basically, Aruba has two primary modes of integration:
- Launching a new UNIX process each time for each test, and
- Reusing the existing process by resetting its STDOUT, STDERR, etc.
Clearly, number 2 is what you want for performance. In order for you to be able to use this method, you must wrap your CLI application in a particular Application::Launcher class, which should have the following signature and methods:
module Appplication
  class Launcher
    attr_accessor :argv,
                  :stdin,
                  :stdout,
                  :stderr,
                  :kernel

    def initialize(argv,
                    stdin = STDIN,
                    stdout = STDOUT,
                    stderr = STDERR,
                    kernel = Kernel)

      self.argv = argv
      self.stdin = stdin
      self.stdout = stdout
      self.stderr = stderr
      self.kernel = kernel

      # initialization and ARGV parsing
      # validation
    end

    def execute!
      code = 0
      # runtime logic
      # only generate output to self.stdout or self.stderr!
      # exception handling
    rescue StandardError => e
      # handle error
    ensure
      kernel.exit(code)
    end
  end
end
Then in your eg bin/script:
#!/usr/bin/env ruby
lib_path = File.expand_path("../lib", __dir__)
$LOAD_PATH << lib_path if File.exist?(lib_path)

require 'application/launcher'

Application::Launcher.new(ARGV).execute!
NOTE
It’s important to note that once the stdout and stderr are passed into the Launcher class, you must always use these attributes instead of the default STDERR and STDOUT in order not to pullute your test outputs. So make sure to either delegate your puts to Launcher.stdout.puts or pass the references to the streams to downstream classes.
You can use the above template for all of your CLI ruby gems, because the benefit is that you will be able to write fast integration tests using Aruba, which use “in-process” testing. Let’s take a look at how to make this happen next.
Aruba and RSpec Configuration
To make Aruba work, add the following to your spec/spec_helper.rb file:
# spec/spec_helper.rb

require 'rspec/core'
require 'aruba'
require 'aruba/rspec'

RSpec.configure do |spec|
  # standard RSpec Configuration

  # Aruba import
  spec.include Aruba::Api
end

Aruba.configure do |config|
  config.command_launcher = :in_process
  # Notice the application launcher class assignment
  config.main_class       = ::Application::Launcher
end
Before you write your first spec, I strongly recommend that you create a shared example that you can invoke, which removes the need to duplicate a lot of boilerplate code for each spec:
# spec/support/aruba_helper.rb

RSpec.shared_context 'Aruba Setup',
                     shared_context: :aruba_setup do

  let(:binary)  { 'bin/my-binary' }
  let(:args)    { [] }
  let(:command) { "#{binary} #{args.join(' ')}" }

  before        { run_command_and_stop(command) }

  let(:cmd)     { last_command_started }
  let(:output)  { cmd.stdout.chomp }

  subject       { cmd }
end

RSpec.configure do |rspec|
  rspec.include_context 'Aruba Setup',
                        include_shared: true
end
What’s happening here?
-
First, we create a shared context
Aruba Setup, where we define our binary executable, the command and its arguments, as well as define thebefore()clause that runs the command we specified. -
In the context of a specific spec we can override the
argsto be sometime else, and then test that we get the exact output we’d expect.
For instance, below we set the args to be ['--help'] and verify that the output matches the words “Usage”:
# spec/commands/help_spec.rb
require 'spec_helper'

RSpec.describe Application::Commands::Help,
               type: :aruba do
  include_context 'Aruba Setup'

  context 'help' do
    let(:args) { %w(--help) }

    subject { output }

    it { should match /Usage/ }
    it { should match /Command:/ }
  end
end
Here, we are testing a particular command — “Help”. Notice how all we are doing here — is importing the shared context and setting the args to ['--help']. After that we are verifying that the output is what we’d expect.
Handing Exits
One caveat of in-process testing is that your library must never call exit() without an explicit receiver, namely — the kernel attribute of the Launcher instance. In tests, you may want to swap out the kernel for a mock that allows you to verify expectations about the exit code of the program.
The same applies to using the versions of puts and print without explicit receiver — instead, use the attributes stderr and stdout of Launcher for this.
In fact, you might want to make Launcher a Singleton, so that at most only one copy exists. Unfortunately, this may cause problems with Aruba. If you can make Singleton pattern work with Launcher, please share your code in the comments!
The specialized uses of puts, warn, print and exit are perhaps the biggest downside of using the in-process Aruba mode. You get an incredible speed of your test suite, but, unfortunately you must deal with the fact that your standard input and output streams are not the real STDIN or STDOUT, and that exit() should never be invoked without the @launcher.kernel.exit.
Using dry-cli
NOTE
You can read the user documentation for this gem on the dry-rb website.
This gem supports commands and sub-commands by implementing command classes, which inherit from Dry::CLI::Command.
A cool pattern is to setup an abstract Base class for your commands, where you can place shared flags using the self.inherited callback, like so:
module Commands
  class Base < Dry::CLI::Command
    class << self
      def inherited(base)
        super
        base.instance_eval do
          option :api_token,
                required: false,
                desc: "Github API token"

          option :per_page,
                required: false,
                default: 10,
                desc: "Page size"

          option :verbose,
                type: :boolean,
                default: false,
                desc: 'Print verbose'
        end
      end
    end
  end

  attr_reader :api_token, :per_page, :client

  # setup delegation to Launcher for output
  def_delegators :@launcher, :stdout, :stderr

  def call(api_token: nil,
           per_page: 10,
           verbose: false)

    @api_token = api_token
    @per_page  = per_page.to_i
    @client    = Octokit::Client.new(
      access_token: api_token
    )
  end
end
Then, implementing individual commands becomes really easy:
module Commands
  class Info < Base
    desc "Print user information"

    def call(**opts)
      super(**opts)
      stdout.puts JSON.pretty_generate(client.user.to_hash)
    end
  end

  register "user", aliases: ["u"] do |prefix|
    prefix.register "info", Commands::Info
  end
end
What can githuh CLI do for you?
- Why did I write it?
Githuh is a CLI tool for interfacing with Github’s API.
At the moment, it offers only two useful features:
-
It can generate a list of your open source projects, suitable for supplying your potential employer with a list of prior inventions.
-
It can export Github Issues into a CSV file, so that it can be imported into a Pivotal Tracker (which, as of this update, is no longer available).
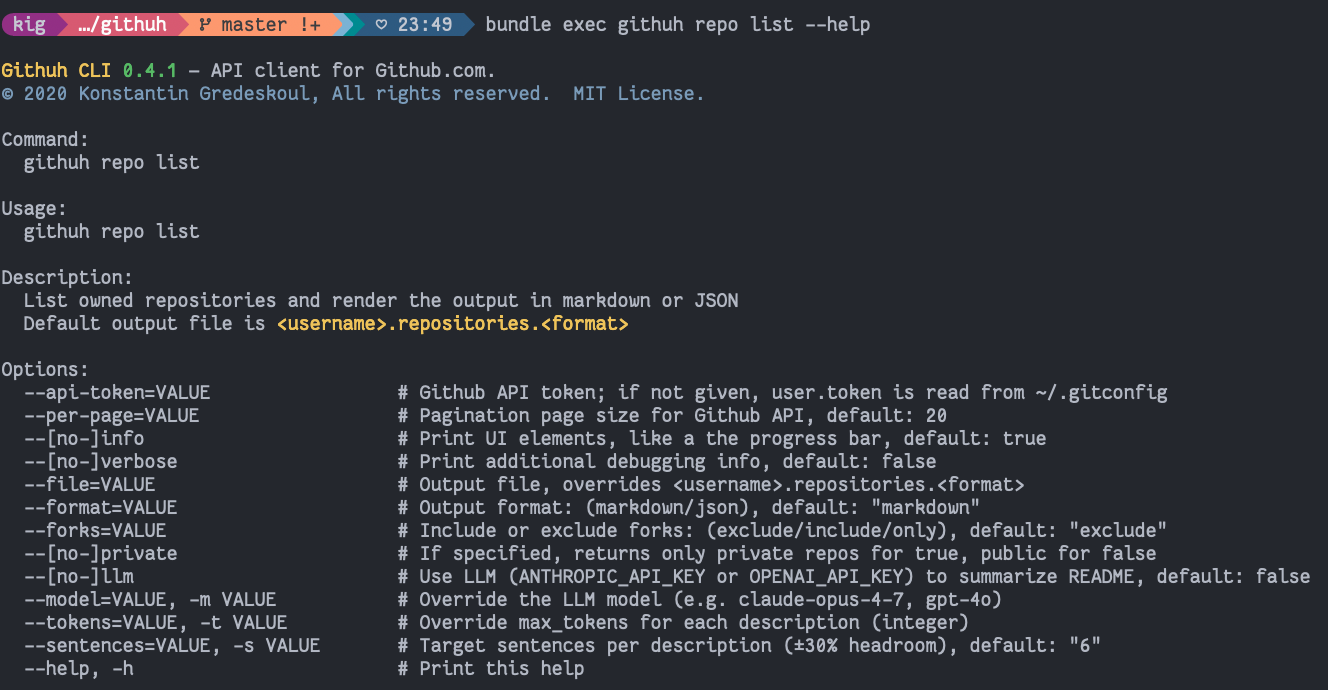
How to Auto-Generate “List of Prior Inventions” based on your Open Source Repos
Command githuh repo list
It can generate a markdown file listing all of your own “source” repositories on Github, suitable for supplying your potential employer with a list of prior inventions. Most of the tech companies are asking for it these days in employment contracts.
$ gem install githuh --no-doc
$ githuh repo list --api-token=NNNN \
    --format=markdown \
    --file=inventions.md
How to Import Github Issues into Pivotal Tracker as Stories
Command githuh issue export
NOTE
This functionality was written to migrate a bunch of Github Issues into Pivotal Tracker, using PT’s CSV Import feature.
This command allows you to export Github Issues from a Github repo/project into to a CSV file, so that it can be imported into a Pivotal Tracker — arguably, the most streamlined tool for software development project management out there.
$ gem install githuh --no-doc
$ githuh issue export kigster/simple-feed \
   --api-token=NNN \
   --file=simple-feed.issues.csv
Summary
In this post I want to share a tiny tool I wrote for migrating Github Issues to Pivotal Tracker, as well as generating the list of “Prior Inventions” based on your open source work.
Separately, I tried to show how I setup most of my CLI libraries for fast integration testing with Aruba and RSpec.
Hopefully, this example is clear enough, and can help you add the proper integration testing with RSpec and Aruba whenever you find yourself needing to implement a CLI tool.
Questions? Comments? Please don’t be shy and post them below.
Thanks!
Comments